

How to Tell if Seeds Are Viable A Grower’s Practical Guide
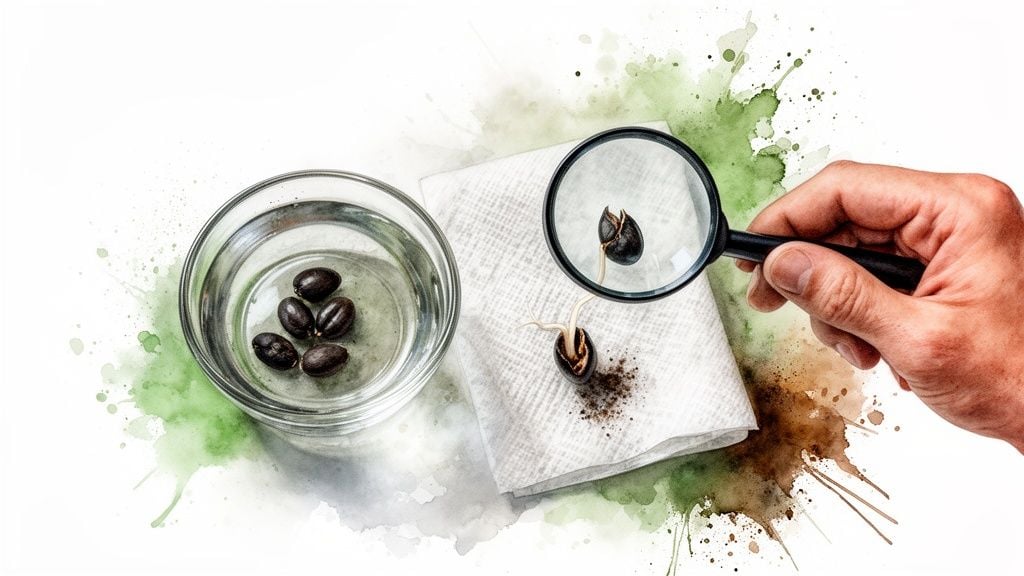
Nothing’s more frustrating than waiting weeks for seeds to sprout, only to realize they were duds from the start. Thankfully, you don’t have to guess. You can figure out if your seeds are good to go with a quick visual inspection, the old-school float test, or a surefire germination test.
These three tried-and-true methods give you a solid read on your seeds’ potential before you even think about planting.
Quickly Checking Your Seeds for Viability
Starting a grow with non-viable seeds is a rookie mistake that even seasoned growers can make if they’re not careful. It’s a waste of time, energy, and soil.
Learning how to spot a good seed is a core skill for any cultivator. It lets you sift through your collection with confidence, so you only plant the seeds most likely to explode with life.
An Overview of Top Viability Tests
Before we get into the nitty-gritty, let’s look at the main ways growers check their seeds. Each test strikes a different balance between speed, simplicity, and accuracy, so you can pick the right one for your needs.
Here are the heavy hitters:
- Visual & Physical Inspection: This is your first line of defense. Just by looking at and feeling the seeds, you can weed out the obvious failures. Healthy seeds just look and feel different.
- The Water Float Test: A quick, non-destructive classic. This test gives you a great hint about a seed’s density and internal structure without harming it. Growers have been using this one for ages.
- The Paper Towel Germination Test: This is the ultimate proof. It takes a few days, but it tells you with almost 100% certainty if a seed has what it takes to sprout.
Getting these basic checks down is a game-changer. A single bad seed can take up precious space in your grow, costing you time and a chunk of your potential harvest. Mastering these simple tests sets you up for a much smoother and more rewarding season.
These skills are essential whether you’re on your first grow or your fiftieth. If you’re new to all this, you can learn more about choosing the right genetics in our guide to cannabis seeds for beginners.
Seed Viability Tests at a Glance
To make it even easier, here’s a quick comparison of the three main methods.
| Test Method | What It Checks | Time Required | Accuracy | Best For |
|---|---|---|---|---|
| Visual/Physical | Color, shape, hardness | 5 minutes | Low | Quickly spotting obvious duds |
| Float Test | Density | 2-4 hours | Medium | A fast, non-destructive batch check |
| Germination Test | Ability to sprout | 2-7 days | High | Getting a definitive answer before planting |
This table should help you decide which test fits your timeline and how certain you need to be.
Now, let’s break down exactly how to perform each of these tests, step by step.
What Healthy Seeds Look and Feel Like
Before you even think about germination methods like the paper towel trick or dropping seeds in water, the best tools you have are your own eyes and fingers. A seed’s appearance and how it feels in your hand can tell you almost everything you need to know about its potential.
After years of handling seeds, you start to get a feel for it. You can quickly separate the winners from the duds, weeding out the obvious failures right away. An unhealthy seed almost always gives itself away with a pale, weak-looking shell, saving you the time and frustration of trying to sprout something that was never going to make it.
The Visual Cues of a Viable Seed
A healthy cannabis seed just looks right. It’s plump, solid, and has a rich, dark color—like a tiny piece of natural armor designed to protect the life inside.
The best ones are usually a deep brown, nearly black, or a mottled grey. Many of the most vigorous seeds I’ve seen have a waxy-looking sheen and distinctive dark, splotchy patterns, often called “tiger stripes.” This mottling isn’t always present, but when it is, it’s a fantastic sign of a mature, healthy seed.
Here are the key visual traits I always look for:
- Dark, Rich Color: Stay away from seeds that are pale green, white, or light tan. Those are almost always immature and just don’t have the energy stored up to sprout.
- Distinct Patterns: If you see those “tiger stripes” or mottled splotches, that’s a great indicator of a mature seed.
- Waxy Sheen: A subtle, waxy coating tells you the shell is intact and hasn’t dried out, which is exactly what you want.
Think of these visual checks as your first line of defense. By setting aside any pale, flimsy-looking seeds from the get-go, you’re already boosting your success rate.
Top-shelf cannabis seeds are typically dark brown to black, sporting that hard, shiny tiger-stripe pattern. They usually measure 2-5mm and should feel rock-solid. If your seeds are dull, pale green, or feel mushy, don’t waste your time—viability in seeds like that can drop to under 20%. That’s a huge gamble in a market projected to hit $1.39 billion by 2032, a trend you can explore further in this Data Bridge report.
The Tactile Test: Feel for Firmness
Looks can sometimes be misleading, which is why the next step is to trust your sense of touch. A seed’s physical structure is a dead giveaway of its viability. It needs a tough, protective outer casing to keep the embryo inside safe and sound until it’s ready to grow.
This is where the classic “squeeze test” comes in. It’s a simple but incredibly effective way to check the seed’s structural integrity.
Just take a seed and gently place it between your thumb and forefinger. Apply slow, steady pressure. You’re not trying to crack a walnut here—just give it a firm pinch.
A viable seed will feel solid. It won’t give way under the pressure, almost like a tiny, smooth pebble. If it easily withstands this squeeze without cracking or flexing, chances are you’ve got a winner.
On the flip side, a bad seed will fail this test spectacularly. It might feel suspiciously light or even hollow. When you apply a bit of pressure, you’ll know right away:
- It Cracks: The shell will audibly splinter or fracture.
- It Crumbles: The entire seed might just turn to dust in your fingers.
- It Collapses: It feels soft and simply flattens out.
Any of those outcomes is a clear sign the seed is no good. Its internal structures are either dried out, damaged, or were never fully developed in the first place. This hands-on feedback is one of the most reliable ways to confirm a seed’s viability without having to germinate it. A seed that fails the squeeze test has virtually zero chance of ever sprouting.
The Classic Water Float Test: A Quick Viability Check
The logic behind it is pretty straightforward. A good, viable seed is dense—it’s packed with a tiny embryo and all the food it needs to get started. A dud, on the other hand, is often just an empty shell, dried out and hollow.
This simple difference in density is exactly what the float test uses to its advantage. When you drop them in water, the heavy, healthy seeds will sink, while the light, likely non-viable ones, will bob on the surface. It’s the perfect next step after a visual inspection, giving you a much clearer picture of viability without having to sacrifice any seeds.
How to Do the Float Test Right
Getting this right is all about patience. If you rush it or read the results too quickly, you could end up tossing out perfectly good seeds.
First, find a clean glass or a small bowl and fill it with room-temperature water. You want the water to be somewhere around 68-77°F (20-25°C). Water that’s too hot or cold can shock the seeds, which is the last thing you want. Gently place your seeds in the water.
Now for the hard part: just wait. Don’t jump to any conclusions for at least a couple of hours. It’s totally normal for good seeds to float at first. Their shells are often so dry that they trap tiny air bubbles, and they just need some time to soak up water and sink.
The classic water float test is one of the most reliable ways to check your seeds. Agricultural studies have shown it can be about 80-90% accurate for cannabis and similar plants—way better than just eyeballing them. In the massive U.S. cannabis market, some growers report losing up to 30% of their investment on bad seed batches when they skip checks like this. You can read more about the growing global cannabis seed market to see why getting this right is so important.
Reading the Results
After a few hours have gone by, it’s time to see what you’ve got. Interpreting the results is mostly simple, but there are a few things to keep in mind.
Most of your good seeds should have sunk to the bottom within 2 to 4 hours. Any seed that sinks is a great candidate for germination. You can gently fish them out and move them right into a damp paper towel or your preferred starting medium.
But what about the ones still floating? If a seed is still on the surface after about 12 hours, that’s a pretty strong sign it’s a no-go. It’s likely hollow or has a cracked shell that’s preventing it from absorbing water. At this point, you can probably discard it.
Here are a few common outcomes:
- Most Seeds Sink Fast: Perfect! This usually means you have a fresh, highly viable batch.
- Some Seeds Take a While: Give any stubborn floaters a gentle tap with your finger. Sometimes a tiny air bubble is the only thing keeping a good seed afloat. If it sinks after a nudge, you’re in business.
- Seeds Still Floating After 12 Hours: These are almost certainly duds. They just don’t have the density of a healthy seed and have a slim-to-none chance of sprouting.
A crucial final tip: don’t leave your seeds in the water for more than 24 hours. Soaking them for too long can actually drown the embryo, ruining a perfectly good seed. The float test is a quick check, not a long soak. As soon as a seed sinks, it’s ready for the next step.
Getting Definitive Proof with a Germination Test
While looking at seeds and floating them in water can help you weed out the obvious duds, those methods are really just educated guesses. When you absolutely need to know if your seeds are going to grow, nothing beats a germination test.
This is the moment of truth. Often called the paper towel test, it’s the gold standard for growers everywhere, from home hobbyists to large-scale cultivators. You’re essentially creating the perfect conditions for a seed to sprout, giving you undeniable proof of life: a taproot.
Prepping for the Paper Towel Test
The beauty of this test is its simplicity, but don’t let that fool you—getting the details right is what makes it work. You only need a few things you probably already have lying around the house.
Here’s your quick supply list:
- Paper Towels: Go for a sturdy, absorbent brand that isn’t too fluffy. Basic, quilt-free towels are best because you don’t want the delicate new taproot getting tangled in the fibers.
- Two Plates or a Sealable Bag: The goal is to create a dark, humid little chamber. Stacking two dinner plates face-to-face is a classic method, but a simple Ziploc-style bag works just as well.
- Spray Bottle with Water: If you can, use filtered or distilled water at room temperature. This avoids any chlorine or contaminants in tap water that might interfere with germination.
With these items, you’re ready to build a perfect little germination station.
Kicking Off the Germination Process
First, lay a paper towel flat on one of the plates. Grab your spray bottle and mist the towel until it’s damp all over but not soaking wet. A common rookie mistake is to drench the towel, which can actually drown the seed before it has a chance to sprout.
Carefully place your seeds on the damp towel, leaving about an inch of space between them. This gives each taproot room to grow and prevents any potential mold from spreading from one seed to another.
Cover the seeds with a second paper towel and give it the same light misting. Finally, place the other plate on top to create a dark, enclosed dome. If you’re using a bag, just fold the paper towel in half and slide it inside, sealing it almost all the way but leaving a tiny gap for air.
Your seeds need warmth to wake up. The sweet spot is a consistent 70-85°F (21-29°C). Good places are often on top of a refrigerator or near a warm router. Just check the towels every day to make sure they’re still damp, and give them a light mist if they start to dry out.
What to Expect and How to Read the Results
Now, you wait. Over the next few days, a viable seed will absorb the moisture, swell, and crack open, pushing out a tiny white taproot. Seeing that little root is the ultimate confirmation—you’ve got life!
You should see signs of a taproot within 2-7 days. For fresh, high-quality seeds, you can realistically expect an 85-95% success rate. For example, fresh feminized seeds, which make up over 60% of the North American market, can hit germination rates as high as 92%. On the flip side, regular seeds can see that rate drop to just 55% after 18 months in storage.
Once a seed sprouts a taproot, it’s viable and ready for planting. Be extremely gentle when handling it—tweezers are your best friend here—and plant it with the taproot pointing down. For a deep dive into that crucial next step, check out our complete germination guide.
If a seed hasn’t shown any signs of life after about 10 days, it’s probably not going to. At that point, it’s safe to call it a dud and move on.
How to Store Seeds for Long-Term Viability

Knowing how to check if your seeds are good to go right now is one thing, but what about the genetics you’re saving for next season, or even a few years down the road? The best seeds are an investment, and protecting that investment comes down to one thing: proper storage.
Think of a viable seed as a living thing, just in a state of suspended animation. And like any living organism, it’s vulnerable to its environment. If you just toss your seeds in a desk drawer and forget about them, you’re basically gambling with your future garden.
The great news is, creating the perfect storage setup is surprisingly easy. It all boils down to protecting your seeds from their three biggest enemies: light, heat, and humidity. Get these three under control, and you can keep your seeds healthy and ready to pop for years.
The Three Enemies of Seed Viability
A seed’s outer shell is like a tiny, natural vault protecting the precious genetic code inside. To keep that vault secure, you have to shield it from the elements that can either damage it or trick the seed into waking up before you’re ready.
Here’s a breakdown of what you’re up against:
- Light: Direct light is a major “go” signal for germination. When seeds are exposed to light, especially UV rays, their protective outer shell starts to degrade, and the delicate embryo inside can get damaged over time.
- Heat: Warm temperatures also tell a seed it’s springtime and time to get growing. Just as importantly, big temperature swings cause the seed to expand and contract, which can create micro-fractures in the shell. Consistent warmth also burns through the seed’s stored energy much faster.
- Humidity: This one might just be the most dangerous of all. Moisture is the primary trigger for germination. If a seed absorbs too much moisture, it might try to sprout right there in the container, only to die. Even low levels of humidity can seep in and create the perfect breeding ground for mold and fungus, which will ruin your seeds in a hurry.
Once you understand these threats, the mantra for long-term storage becomes clear: cool, dark, and dry.
Creating the Ideal Storage Environment
You don’t need a high-tech laboratory to nail the “cool, dark, and dry” standard. A few basic tools and a little bit of planning can create a stable environment that dramatically extends the life of your collection.
The sweet spot for storage temperature is between 34-40°F (1-4°C). This is why a refrigerator is the go-to choice for anyone serious about long-term storage. The consistent cold slows the seed’s metabolism to a crawl, preserving its energy until you’re ready to plant. For shorter-term storage (say, under a year), a cool closet or basement drawer can work, as long as the temperature stays stable and below 70°F (21°C).
The real key is stability. Storing seeds in a garage or an outdoor shed is a terrible idea because the temperature can swing wildly from day to night. Those fluctuations put a ton of stress on the seeds and will drastically shorten their lifespan.
Keeping them dark is the easy part. Just make sure you use an opaque container. A blacked-out mason jar, a small light-proof box, or even the original breeder’s pack tucked inside another container works perfectly.
Choosing the Right Container and Desiccants
The final piece of the puzzle is keeping your seeds bone dry. This means you need an airtight container that will lock out any ambient humidity.
Here are a few solid options for containers:
- Glass Mason Jars: These are fantastic. They create a perfect airtight seal, but since they’re clear, you’ll need to either paint the outside black or store the jar in a completely dark place.
- Mylar Bags: The same kind used for long-term food storage. They are light-proof, airtight, and an excellent choice for protecting your seeds from all the elements.
- Small Plastic Containers: If you go this route, look for ones that have a rubber gasket in the lid to ensure a truly tight seal. In a pinch, even a simple pill bottle can work for a small number of seeds.
Want to take your moisture control to the next level? Add a desiccant to your container. Desiccants are materials that actively absorb moisture from the air, creating an ultra-dry little micro-environment for your seeds.
You can easily find small silica gel packs online—they’re the same little packets that come in new shoe boxes or vitamin bottles. Just toss one in your container with your seeds. For a quick DIY solution, you can wrap a small amount of uncooked rice in a bit of cheesecloth. Just remember to swap out your desiccant every six months or so to make sure it’s still doing its job.
At Liberty Seed Bank, we believe that a successful grow starts with high-quality genetics and the knowledge to get them started right. From beginner-friendly autoflowers to connoisseur-grade strains, we’re dedicated to providing the seeds and support you need. Explore our premium selection today and start your next grow with confidence. Find your perfect seeds at https://libertyseedbank.com.
FAQs
Can I Do Anything to Help a Stubborn Seed Germinate?
You bet! Sometimes, older seeds or ones with extra-tough shells just need a little encouragement. If you have a seed that you believe is viable but is struggling to crack open, you can try a couple of gentle tricks to give it a nudge.
One popular method is scarification. This is just a fancy word for gently scuffing the outer shell to help water get inside. You can do this by lightly rubbing the seed on a piece of fine-grit sandpaper or even the striker pad of a matchbox. The goal is to create a tiny abrasion, not to grind it down.
Another go-to technique is pre-soaking. Just drop the seeds in a glass of room-temperature water for 12-24 hours before you put them in a paper towel. This helps soften that tough outer casing and hydrate the embryo, basically telling it that it’s go-time.
Are Small or Pale Seeds Always a Waste of Time?
Not always, but they are definitely a major red flag. You should be skeptical. The best seeds, the ones most likely to give you strong plants, are typically dark, hard, and feel solid. These traits tell you the seed fully matured on the parent plant and is packed with enough food to power its initial growth spurt.
Pale green, white, or tiny little seeds are usually a sign that they’re immature. While you might get lucky and have one or two sprout, they often cause headaches later on. You’ll run into issues like:
Failure to Germinate: They just don’t have the energy reserves to push out that first taproot.
Weak Seedlings: Even if they pop, they often produce slow, fragile seedlings that seem to struggle with everything.
More Vulnerability: These weaker plants are an easy target for pests, diseases, and stress.
For the best shot at a healthy harvest, always start with the darker, firmer, and healthier-looking seeds. It stacks the odds in your favor right from the beginning.
What Does It Mean if a Seed Sinks but Never Sprouts?
Ah, the classic head-scratcher. You do the float test, the seed sinks like a stone, you get your hopes up… and then, nothing. A sinking seed is a great sign—it usually means it’s dense and has a developed embryo inside—but it’s not a 100% guarantee that it will pop.
Think of the float test as a good first-pass filter. It’s fantastic for weeding out the obviously hollow, useless seeds. But a seed can pass that test and still fail to sprout for a few reasons:
Deep Dormancy: The seed might be perfectly healthy but just in a very deep sleep, which is especially common with older seeds.
Internal Issues: Sometimes, there’s an issue with the embryo itself that you just can’t see from the outside.
Your Germination Setup: The problem might not be the seed at all. If it’s too cold, if your paper towel is soaked instead of damp, or if there’s any contamination, even a perfect seed will refuse to sprout.
The takeaway here is that the float test is a strong indicator, not a final verdict. A sinking seed is a great candidate, but the actual germination test is where the real truth comes out.


No Comments