How Often to Water Weed Plants: Quick Guide for Healthy Growth

Figuring out how often to water your weed can feel like a guessing game, especially when you’re starting out. The simple answer? Aim for every 2-3 days, but with one huge caveat: always check your soil first. This isn’t about a rigid schedule; it’s about tuning into what your plants actually need day-to-day.
The Real Secret to How Often You Should Water
Every new grower wants a simple, set-it-and-forget-it watering calendar. I get it. But the truth is, your plant’s thirst changes constantly based on its growth stage, the temperature in your tent, and a dozen other factors. Sticking to a strict schedule is one of the fastest ways to overwater and cause problems.
The real goal is to get into a rhythm of observation. This means checking on your plants every day but only giving them a drink when they tell you they’re ready.
Why Letting the Soil Dry Out Is Non-Negotiable
If there’s one concept to burn into your brain, it’s the wet-dry cycle. When you water, you’re drenching the root zone. As your plant drinks up, the soil dries out, and this process is what pulls fresh, vital oxygen down to the roots. That oxygen is just as important as water for healthy roots and nutrient absorption.
If you water too often, the soil stays soggy. This suffocates the roots, cutting off their oxygen supply and creating the perfect environment for nasty stuff like root rot and fungus gnats to take hold.
The core principle is simple: Let your plants tell you when they’re thirsty. A successful watering strategy is reactive, not prescriptive. You respond to the plant’s needs rather than imposing a schedule on it.
This whole approach has been refined over years of cultivation. Early on, people thought outdoor plants needed massive amounts of water every single day. But as growing became more scientific, we learned to tie irrigation directly to the plant’s size and goals.
Modern best practices, which we detail in our complete cannabis growing guide, now recommend watering only when the top layer of soil is dry and the container is ready to accept about 25–33% of its volume in water. This shift proves just how important it is to check your plants instead of just following a calendar.
Quick Watering Checklist
Before you reach for that watering can, run through this quick mental checklist. It’s a simple habit that will save you from a world of headaches.
| Check | What It Means | Action |
|---|---|---|
| Topsoil Touch Test | Is the first inch or two completely dry? | If yes, it’s a good sign they might be thirsty. |
| Pot Weight | Does the pot feel light compared to when it was just watered? | A light pot means the water has been used up. |
| Plant Appearance | Are the leaves vibrant and perky, not droopy or sad? | Healthy leaves mean you’ve likely timed it right. |
If you get a “yes” on all these points, it’s almost certainly time for a good watering. This simple routine will help you dodge the most common beginner mistakes and keep your plants happy and healthy all the way to harvest.
How to Water Your Plants at Each Growth Stage
Cannabis plants are a lot like people—their needs change as they grow up. A tiny seedling just sips water, while a big, bushy plant in full flower is incredibly thirsty. If you want vigorous growth and a heavy harvest, you have to learn how to adapt your watering schedule to match your plant’s current needs. Forget a rigid, one-size-fits-all approach; this is all about listening to your plant.
Seedling Stage: Less is More
For the first couple of weeks, your plant is incredibly fragile. Seedlings have tiny, delicate root systems that simply can’t handle a deep soaking. The goal here is simple: keep the top layer of soil consistently moist, but never soggy.
Overwatering is the number one killer of young seedlings. It’s a classic rookie mistake.
- Frequency: You might need to water once or twice a day, but only a little at a time.
- Method: A spray bottle is your best friend here. Gently mist the soil around the seedling’s base to avoid disturbing its new roots.
- Amount: We’re talking ounces, not gallons. The soil should feel like a lightly wrung-out sponge, not a swamp.
So many new growers treat a seedling like a mature plant, which almost always leads to stunted growth or “damping off,” a fungal disease that rots the stem. If you’re starting from seed, get the basics right by checking out a solid cannabis germination guide first.
Vegetative Stage: Building a Thirsty Plant
Once your plant has a few sets of true leaves and a solid footing, it’s officially in the vegetative stage. This is when growth really takes off. Your plant is focused on building its “solar panels”—all those big fan leaves—and developing a strong frame. Naturally, its thirst will increase dramatically to fuel all that work.
Now you can graduate from misting to more thorough watering. The idea is to encourage the roots to stretch downward in search of moisture, building a strong foundation.
My Go-To Method: The wet-dry cycle is your key to success from here on out. I wait until the top inch or two of soil is completely dry and the pot feels noticeably lighter. Then, I water slowly until I see about 10-20% of the water run out the bottom. This ensures the entire root zone gets a drink and, just as importantly, pulls fresh oxygen down to the roots as the soil dries out again.
Flowering Stage: The Final Push
When your plant starts to flower, its water needs will hit their peak. Producing dense, frosty buds takes a massive amount of energy, water, and nutrients. For the first few weeks of flowering, you might feel like you’re watering constantly.
But things change as you get closer to harvest. In the final two to three weeks, the plant’s metabolism slows down as the buds ripen. You’ll notice its water uptake decreases, and you’ll naturally start waiting longer between waterings. Pay close attention here, as keeping the soil too wet can invite bud rot, which loves humid conditions.
A Quick Note on Autoflowers vs. Photoperiods
So, do autoflowers need to be watered differently than photoperiods? Yes and no. The principles are the same, but their different timelines change the stakes.
- Autoflowers: These plants are on a fixed schedule from sprout to harvest. They have very little time to recover from stress, so overwatering them early on can permanently stunt their size and wreck your final yield. You have to be more careful.
- Photoperiods: With a much longer (and controllable) vegetative stage, photoperiod plants are way more forgiving. If you make a mistake, they have time to bounce back. Their root systems can also grow to be massive, meaning they’ll demand a huge amount of water once they hit peak flower.
Watering Frequency by Growth Stage and Pot Size
To give you a better idea of how this looks in practice, here’s a sample schedule. Remember, this is just a starting point—your specific environment and plant will dictate the actual frequency.
| Growth Stage | 3-Gallon Pot (Approx. Interval) | 5-Gallon Pot (Approx. Interval) | Key Considerations |
|---|---|---|---|
| Seedling | Every 1-2 days (mist/light water) | Every 1-2 days (mist/light water) | Keep topsoil moist, not saturated. Use a spray bottle. |
| Early Veg | Every 3-5 days | Every 4-6 days | Begin wet-dry cycle. Let top inch of soil dry out. |
| Late Veg | Every 2-4 days | Every 3-5 days | Plant is growing fast; water needs increase significantly. |
| Early Flower | Every 2-3 days | Every 2-4 days | Peak water consumption. Monitor daily. |
| Late Flower | Every 3-5 days | Every 4-6 days | Water needs decrease as harvest approaches. Watch for signs. |
Think of this table as a general guideline, not a strict rulebook. For example, a thirsty plant in a 5-gallon pot during late veg might need a full gallon of water every three days in a hot, dry room. That same plant as a seedling might have only needed a few ounces every other day. Always trust the signs your plant and your pot are giving you over any calendar.
Factors That Change Your Watering Schedule
If you think you can just mark a watering day on your calendar and call it good, think again. That’s a rookie mistake. Your grow setup is a living, breathing ecosystem, and a handful of key variables are constantly changing how thirsty your plants are. Nailing your watering schedule isn’t about following a rigid plan; it’s about learning to read your plants and their environment.
Let’s break down the major players that will dictate how often you’ll be grabbing that watering can.
Your Choice of Growing Medium
The very foundation of your grow—what the roots are sitting in—is probably the biggest factor. Different mediums hold on to water in completely different ways.
A thick, heavy soil mix acts like a sponge. It soaks up a ton of water and holds it for a while, which means less frequent watering. But there’s a catch: it’s incredibly easy to overdo it, leaving roots to sit in a boggy, suffocating mess.
On the flip side, you have light, airy mediums like coco coir or a mix with a lot of perlite. These drain super fast. While this is great for getting oxygen to the roots, it also means you’ll be watering much more often, sometimes even once a day, to keep things from drying out.
The Type and Size of Your Container
The pot isn’t just a bucket for dirt; it’s a critical piece of your root zone’s environment. The material and size of that container can drastically change your watering frequency.
- Fabric Pots: Often called “smart pots,” these are my personal favorite. The breathable fabric lets the roots get plenty of air and prevents them from circling the pot. The trade-off is that they dry out way faster, so you’ll be watering more.
- Plastic Pots: Your standard nursery pot. Since plastic isn’t porous, it holds moisture for a long time. This gives you a bit of a buffer if you forget to water, but it also ramps up the risk of root rot if you’re too heavy-handed.
- Terra Cotta Pots: You don’t see these as often for cannabis, but they act a lot like fabric pots. The porous clay actively pulls moisture from the soil, causing it to dry out very quickly.
Pot size is just as important. Sticking a tiny seedling in a massive 10-gallon pot is a classic recipe for disaster. The little roots can’t possibly drink all that water, so the soil stays soggy and the plant drowns. In contrast, a big plant crammed into a small pot will be constantly thirsty and root-bound.
Your Grow Room Environment
Your grow tent is its own little microclimate, and the conditions you set have a huge impact. Temperature and humidity directly control how much water your plants “exhale” through their leaves in a process called transpiration.
If your room is hot and dry with low humidity (around 30-40% RH), your plants will be working overtime to cool themselves down. They’ll pull water up from the roots much faster, and you’ll have to water more often to keep pace.
Now, picture a cooler, more humid space (around 60-70% RH). Transpiration slows way down. The plants aren’t losing as much moisture, so the soil stays damp longer, and you’ll water less. Managing this is absolutely crucial during the cannabis flowering stage, where high humidity can lead to dreaded bud rot.
The Genetics of Your Strain
Finally, never forget that every strain is a unique individual. Some are just naturally thirstier than others.
Indicas, which typically come from cooler, mountainous regions like the Hindu Kush, are often shorter, bushier plants. From my experience, they tend to be a bit more conservative with their water intake.
Sativas, on the other hand, evolved in hot, humid climates near the equator. They’re often lanky and tall, and they tend to be serious drinkers, transpiring a lot to cope with the heat.
This isn’t a 100% rigid rule, but it’s a good starting point. Any time you pop a new seed, treat it like you’re getting to know a new friend. Pay close attention for the first few weeks to figure out its unique drinking habits.
Reading the Leaves: Are Your Plants Thirsty or Drowning?
Your plants are talking to you all the time. The trick is learning how to listen. Getting watering right is probably the single biggest hurdle for new growers, and it’s easy to mistake a plant that’s drowning for one that’s just thirsty. Let’s break down what your plants are trying to tell you so you can catch these issues before they turn into real problems.
Spotting these visual cues early on is a skill that makes all the difference. It’s what separates a quick, easy fix from a lost harvest.
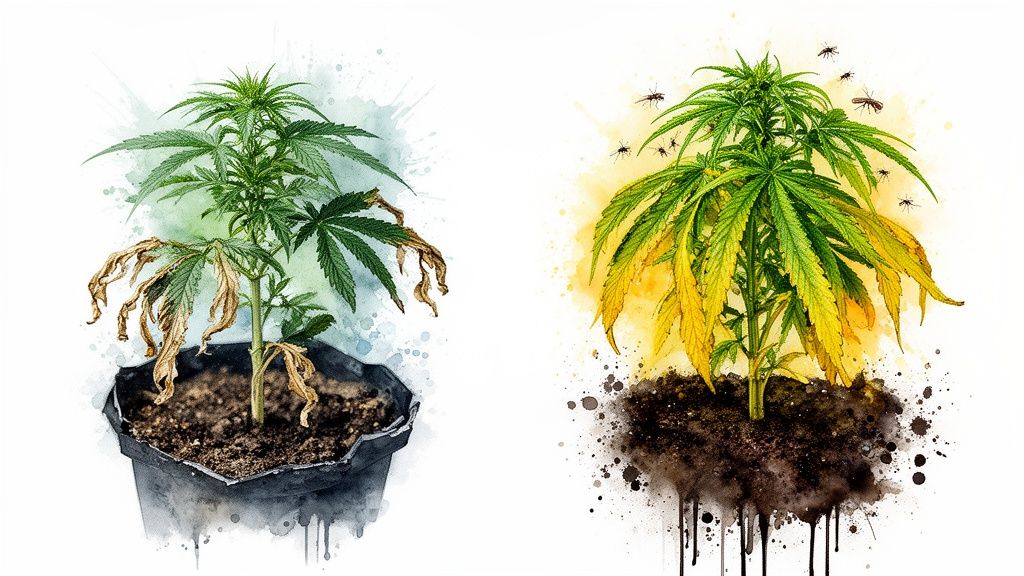
The Telltale Signs of an Underwatered Plant
A thirsty plant is not subtle about it. The signs are usually dramatic and pretty easy to diagnose because the plant simply lacks the internal water pressure (called turgor pressure) to hold itself up.
Here’s what a thirsty plant looks like:
- Limp, Lifeless Leaves: The whole plant just looks sad and droopy. If you touch the leaves and stems, they’ll feel soft and weak.
- Dry, Papery Texture: Leaves might feel thin and brittle. In really bad cases, they’ll start to yellow and get crispy on the edges.
- Soil Pulling Away: The soil will be bone dry. You’ll often see a gap forming between the soil and the side of the pot as it shrinks.
- Light-as-a-Feather Pot: Go ahead and lift it. An underwatered pot will feel surprisingly light because all the water weight is gone.
The good news? Underwatering is usually an easy fix. A good, slow soak will have a wilted plant perking right back up within a few hours.
Identifying Overwatering: The Silent Killer
Overwatering is a whole different beast—it’s far more dangerous and way more sneaky. The real irony is that the first signs can look a lot like a thirsty plant, leading many growers to panic and add even more water, making everything worse.
The key difference is in the leaves. An overwatered plant’s leaves will be firm and curled downwards, almost like a claw. They look heavy and bloated with water because the roots are literally suffocating. Drenched soil has no oxygen, so the roots can’t breathe, and they can’t absorb nutrients either.
Overwatering isn’t about how much water you give at once—it’s about how often you give it. Watering again and again before the soil has a chance to dry out is what leads to those oxygen-deprived roots.
This swampy environment is also a perfect invitation for root rot and pests.
A Side-by-Side Comparison
To really nail the diagnosis, you have to look at the whole picture: the leaves, the soil, and even the weight of the pot. For instance, if the topsoil is constantly damp, that’s a huge red flag for overwatering and a welcome mat for annoying fungus gnats.
Here’s a quick cheat sheet to help you tell the difference:
| Symptom | Underwatering (Thirsty) | Overwatering (Drowning) |
|---|---|---|
| Leaf Appearance | Sad, limp, wilted droop | Firm, claw-like, downward curl |
| Leaf Feel | Soft, thin, papery | Puffy, swollen, heavy with water |
| Leaf Color | Uniform wilting, can yellow later | Yellowing or brown spots, usually on lower leaves first |
| Soil Condition | Bone dry, pulling away from pot sides | Constantly damp or muddy on top |
| Pot Weight | Feels very light | Feels consistently heavy |
| Common Pests | Less common, but spider mites love dry conditions | Fungus gnats thrive in moist topsoil |
When in doubt, always trust your hands. The classic “finger test” is your most reliable tool. Stick your finger about an inch or two into the soil. If it comes out clean and dry, it’s probably time to water. If it’s cool and moist with bits of soil sticking to it, give it another day.
By combining what you see with what you feel, you’ll stop guessing and start giving your plants exactly what they need, when they need it. This is how you build a healthy garden that thrives from start to finish.
How to Really Know When Your Plants Need Water
Forget about watering on a strict schedule. That’s one of the fastest ways to run into problems. Instead, you need to learn how to “read” your plants and their soil to know exactly when they’re thirsty.
I’m going to walk you through three simple, field-tested methods that growers rely on every single day. Once you get the hang of these, watering will feel less like a guessing game and more like a natural part of your routine. Each technique gives you a different piece of the puzzle, helping you avoid the classic mistakes of over- and underwatering.
The Good Ol’ Finger Test
This is the oldest trick in the book for a reason—it’s simple, quick, and surprisingly accurate. All you’re doing is checking the moisture in the top couple of inches of your growing medium.
Just stick your index finger into the soil near the edge of the pot, down to about your first knuckle.
- Does it feel damp and cool? If soil is sticking to your finger, the plant has plenty of water. Check it again tomorrow.
- Does it feel dry and your finger comes out clean? That’s the green light. The top layer has dried out, and it’s time to give your plant a drink.
This is your go-to, daily check-in method. It works great for soil and coco coir and helps you maintain that crucial wet-dry cycle that roots love.
The Pot Lift Test
While poking the soil tells you about the top layer, lifting the pot tells you what’s happening throughout the entire root zone. This is hands-down the most reliable low-tech method out there, and it’s what most experienced growers rely on. It takes a little practice, but once you get the feel for it, it’s foolproof.
Here’s how you do it:
- Get Your “Full” Weight: Right after you’ve given a plant a thorough watering (with about 10-20% runoff), lift the pot. Get a really good sense of how heavy it feels. That’s your baseline for a fully saturated container.
- Lift It Daily: Each day, give the pot a quick lift. You’ll immediately notice it getting lighter as the plant drinks and water evaporates.
- Water When It’s Light: When the pot feels noticeably lighter—almost like it’s half its original wet weight—it’s time to water again.
The real beauty of this technique is that it prevents you from watering when the topsoil is dry but the bottom of the pot is still a swamp. This is a super common cause of overwatering, and the lift test helps you dodge it completely.
Using a Soil Moisture Meter
If you’re someone who likes hard data, a soil moisture meter can take the guesswork out of the equation. These are pretty cheap, simple tools that you stick into the soil. They measure the moisture level and give you a reading on a scale, usually from ‘Dry’ to ‘Wet’.
To get an accurate reading, push the probe into the soil about halfway down and midway between the plant’s stem and the edge of the pot. This gives you a snapshot of what’s happening in the core of the root zone.
So, which one should you use? Here’s a quick rundown.
| Method | The Good | The Bad |
|---|---|---|
| Finger Test | It’s free, fast, and easy. | Only tells you about the topsoil; can be tricky with huge pots. |
| Pot Lift | Super accurate for the whole container. | Takes a little practice to get the “feel” right. |
| Moisture Meter | Gives you a precise number to work with. | You need to buy one, and the cheap ones can be unreliable. |
Honestly, the best growers use a combination of these. Start with a quick finger test, back it up by lifting the pot, and maybe use a meter to confirm your judgment until you’ve built up that grower’s intuition. Using all three gives you the most complete picture of what your plants truly need.
At Liberty Seed Bank, we believe that a great harvest starts with great genetics and the right knowledge. From beginner-friendly autoflowers to high-THC photoperiods, we have the premium seeds you need to succeed.
FAQs
Should I Water My Weed Plants at Night or in the Morning?
This one’s easy: water your plants in the morning or right when your grow lights flick on.
Timing your watering for the start of the “day” gives your plants the entire light cycle to put that water to work. They’ll use it for photosynthesis and transport nutrients, and the warmth from the lights helps excess moisture evaporate. This keeps the whole system chugging along.
Watering at night is asking for trouble. When the lights go off and temperatures drop, that water just sits in the pot, creating a cold, damp, low-oxygen environment. It’s a perfect storm for root rot and other nasty pathogens.
How Much Runoff Should I Get When Watering?
When you’re growing in pots with drainage holes (like in soil or coco coir), a good rule of thumb is to aim for 10-20% runoff.
So, if you pour in a gallon of water, you should see a cup or two collect in the saucer below.
Why bother with this? Two big reasons:
You know the soil is soaked. Runoff is your confirmation that the entire root ball is saturated, not just the top few inches.
It flushes out old salts. Nutrients leave behind mineral salts that can build up and lock out future feedings. A little runoff with each watering helps wash these away before they become a problem.
Pro-Tip: Don’t forget the most important part! Dump out the runoff from your saucers. Letting your pots sit in a puddle of stagnant, used water completely defeats the purpose and can drown the roots from the bottom up.
Does the Type of Water I Use Really Matter?
Absolutely. The water you start with is the foundation for everything else. While you can grow a plant with straight tap water, knowing what’s in it can save you a lot of headaches later.
Most city water has chlorine or chloramine. These are great for killing bacteria in city pipes, but they can also harm the beneficial microbes in your soil.
For chlorine, you can simply let your water sit out uncovered for 24 hours, and it will evaporate.
Chloramine is more stubborn and won’t evaporate. You’ll need a carbon filter (like the kind on your fridge or a dedicated garden filter) to remove it.
The other big variable is your water’s pH and mineral content, which can be wildly different depending on where you live. It’s always a smart move to test your water’s pH after mixing in your nutrients. You’ll want to adjust it to the right range—usually 6.0-7.0 for soil or 5.5-6.5 for coco and hydro—before you water.
If you want total control, you can use filtered or reverse osmosis (RO) water. This gives you a pure, blank slate. Just know that RO strips out everything, including essential minerals. If you use RO water, you must add a Cal-Mag supplement back in to avoid deficiencies.


No Comments